
A service account is a special type of account used in software applications to perform automated tasks without human intervention. It is commonly used in cloud services and APIs to allow applications to authenticate and interact with other services securely.
Key Features of Service Accounts
- Non-Human Identity: Unlike user accounts, service accounts are not tied to a specific individual. They are designed for applications or services.
- Authentication: Service accounts use keys or tokens for authentication, allowing secure access to resources without requiring user credentials.
- Role-Based Access Control (RBAC): Service accounts can be assigned specific roles and permissions, limiting their access to only what is necessary for their function.
- Automation: Ideal for automating tasks such as data processing, scheduled jobs, or background services.
Common Use Cases
- Cloud Services: Accessing cloud resources (e.g., Google Cloud, AWS) to perform tasks like data storage, compute operations, or API calls.
- CI/CD Pipelines: Automating deployment processes in continuous integration and continuous delivery workflows.
- Microservices: Allowing different services within an architecture to communicate securely.
How to Create a Service Account
- Choose the Platform: Depending on your cloud provider (e.g., Google Cloud, AWS, Azure), the steps will vary.
- Define Permissions: Determine what resources the service account needs to access.
- Create the Account:
- For Google Cloud: Use the Google Cloud Console or
gcloudcommand-line tool. - For AWS: Use the AWS Management Console or AWS CLI.
- For Google Cloud: Use the Google Cloud Console or
- Generate Keys: Create and download the service account keys for authentication.
- Implement in Application: Use the keys in your application code to authenticate and interact with the necessary services.
Example in Google Cloud
To create a service account in Google Cloud:
Copygcloud iam service-accounts create [SERVICE_ACCOUNT_NAME] \
    --description="Description of the service account" \
    --display-name="Display Name"
Default service accounts
When you create a cluster, Kubernetes automatically creates a ServiceAccount object named default for every namespace in your cluster. The default service accounts in each namespace get no permissions by default other than the default API discovery permissions that Kubernetes grants to all authenticated principals if role-based access control (RBAC) is enabled. If you delete the default ServiceAccount object in a namespace, the control plane replaces it with a new one.
If you deploy a Pod in a namespace, and you don’t manually assign a ServiceAccount to the Pod, Kubernetes assigns the default ServiceAccount for that namespace to the Pod
For more detail
Understanding RBAC: What It Is and Its Importance
Role-Based Access Control (RBAC) is a method used in Kubernetes to establish detailed permission settings within Kubernetes clusters.
How RBAC Functions
To grasp how RBAC operates, let’s review the process step by step:
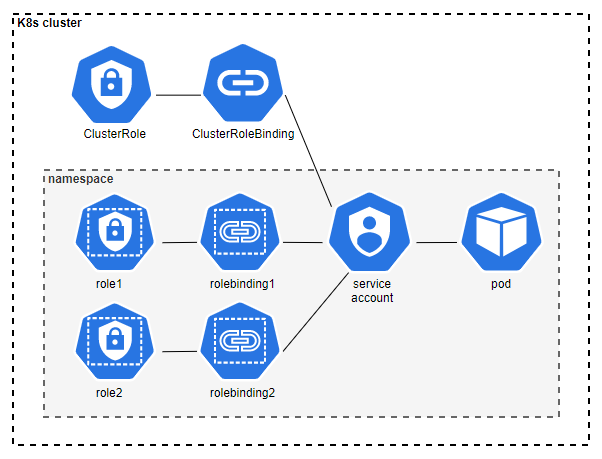
Step 1: Define a Role (Role or ClusterRole) with Specific Permissions
- A Role is confined to the Kubernetes namespace where it is created, allowing access to resources within that namespace.
- A ClusterRole, on the other hand, is not limited to a single namespace and can grant access to resources across multiple namespaces as well as to cluster-wide resources.
Step 2: Create a Service Account or Utilize an Existing User or Group
- Service accounts are Kubernetes objects that can be created and managed within Kubernetes. Each pod is assigned a service account, and when the pod starts, the service account token is automatically mounted inside it, enabling communication with the kube-apiserver.
- Unlike service accounts, users and groups are not Kubernetes objects and must be managed externally.
Step 3: Bind Roles to a Service Account, User, or Group
- A RoleBinding links a Role to a user or service account and exists in the same namespace as the Role it references.
- RoleBindings can also bind a ClusterRole, allowing the permissions granted by the ClusterRole to be effective within the namespace of the RoleBinding.
- To apply permissions from a ClusterRole across all namespaces, a ClusterRoleBinding is used.
You now have a basic understanding of how RBAC works. It seems straightforward, but there are additional nuances worth discussing.
Additional Resources and Best Practices for RBAC
For further information, refer to the official Kubernetes documentation on Using RBAC Authorization.
Best Practices for Implementing RBAC:
- Adopt the Principle of Least Privilege: Ensure that every service account or user has only the minimum permissions necessary to perform their tasks.
- This principle is particularly critical for managing Kubernetes secrets and for permissions related to creating new pods, which can provide access to sensitive information.
- Exercise caution when assigning a ClusterRole with a ClusterRoleBinding to a pod, as this grants the pod permissions across all namespaces within the cluster.